Practice is where the real learning happens. This is where you take the words you have scanned or added to a deck and turn them into knowledge you actually remember. Snap to Learn gives you two ways to practice -- typing on a keyboard or writing by hand -- and both are designed to help you build lasting vocabulary skills. Let's walk through everything.
Starting a Practice Session
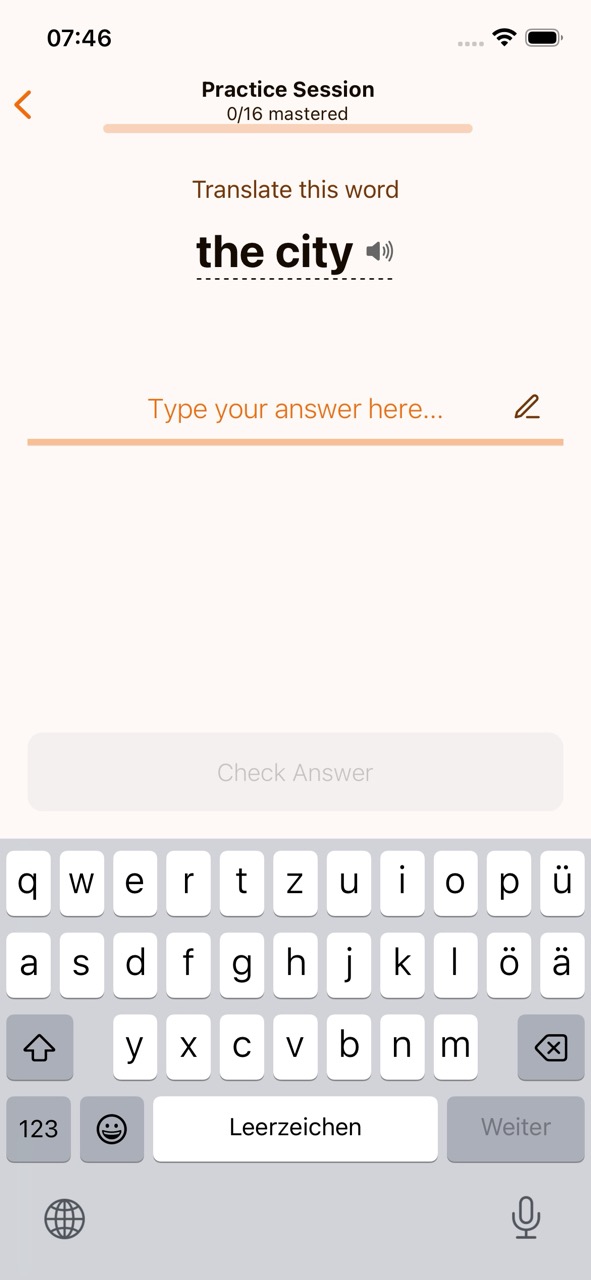
Once you have a deck with words in it, you can start practicing right away. There are two ways to jump in:
- Practice the whole deck -- Tap the "Practice" button at the bottom of the deck view. This loads all the unmastered words and works through them in batches.
- Practice a single word -- Tap "Practice" next to any individual word in your deck. This is great when you want to focus on one tricky word.
When a session starts, you will see a progress bar at the top of the screen showing how many words you have mastered out of the total (for example, "0/16 mastered"). This updates in real time as you work through your words.

How Practice Works -- The Batch System
Rather than throwing all your words at you at once, Snap to Learn breaks them into manageable batches of 5 words. Here is how the system works:
Phase 1 -- Getting Familiar (Rounds 1 through 4): Words appear in the same order every time. This repetition helps you build initial familiarity with each word before things get challenging. You will see the same 5 words cycle through in order, giving you multiple chances to practice each one.
Phase 2 -- Testing Real Recall (Rounds 5 and beyond): Once you have been through the batch a few times, the order becomes random. Now you are truly testing whether you know each word, not just remembering it because it came after the last one.
The Mastery Threshold: Each word needs 7 correct spellings to be marked as mastered. This is not 7 in a row -- it is 7 total correct answers. The app tracks your streak (correct answers in a row) for each word, but the mastery count is cumulative.
Auto-Advance: When you get an answer right, the app pauses briefly to show you the success feedback, then automatically moves to the next word. No need to tap anything.
Batch Progression: Finished all 5 words in a batch? The next batch of 5 loads automatically. The session continues until every word in the deck is mastered.
Reading the Progress Bar
The bar at the top of every practice session is more than a simple fill -- it's a per-word heat strip. Each word in your session gets its own slice, and the slices are grouped into the same batches of five that you practice in.
- Each slice deepens as you learn. A brand-new word starts faint. Every correct spelling deepens its color, until it's rich and fully saturated once the word is mastered (7 correct). So the strip literally "heats up" as you make progress.
- Your current word is highlighted. The word you're answering right now carries a thin outline, so you can always see exactly where you are in the session.
- It matches your theme. The strip uses warm orange in light mode and teal in dark mode, so it always feels at home.
The header above the strip still shows your headline numbers -- the current batch and how many words you've mastered out of the total (for example, "Batch 1/2 · 3/16 mastered"). Together they give you both the big picture and a word-by-word read on where your attention is needed, without leaving the session.
Keyboard Mode
Keyboard mode is the default way to practice. A text input field appears at the bottom of the screen with a "Check Answer" button below it.
- Check Answer -- Tap this button to submit your answer. It stays disabled until you have typed something.
- Switch to handwriting -- See the pencil icon next to the text input? Tap it anytime to switch to handwriting mode. You can go back and forth freely.
Handwriting Mode
This is the feature that makes Snap to Learn different from every other vocabulary app. Instead of just typing translations, you write them by hand -- and the research behind this approach is compelling.
Why Handwriting Makes a Difference
Studies on handwriting and memory consistently show that writing by hand creates stronger memory traces than typing. Here is why:
- Motor memory reinforcement -- When you physically form each letter, your brain engages motor planning, visual processing, and language centers all at once. Typing only engages a key-press action that is the same regardless of the letter.
- Deeper encoding -- The slower, more deliberate act of handwriting forces you to think about each letter and word more carefully. This deeper processing leads to better retention.
- Better recall -- Research has shown that students who write vocabulary words by hand score significantly higher on retention tests compared to those who only type them.
- Especially powerful for new scripts -- If you are learning a language with different characters or special accents (French, German, Spanish, Chinese, Arabic, and many others), writing them by hand helps your brain internalize those unfamiliar shapes.
- Combined memory pathways -- Handwriting creates both motor memory (how the word feels to write) and visual memory (how the word looks in your own handwriting). These dual pathways give your brain more ways to recall the word later.
For parents: this is not just a gimmick. Handwriting-based vocabulary study is one of the most evidence-backed learning techniques available, and Snap to Learn makes it practical and accessible on any phone or tablet.
First-Time Setup -- Downloading the Language Model
The first time you switch to handwriting mode for a given language, you will see a prompt to download the handwriting recognition model for that language.

Here is what you need to know:
- The download is small -- typically 5 to 10 MB per language.
- You only need to download it once per language. After that, handwriting recognition works entirely offline.
- Tap "Download Model" and wait a few seconds for it to complete.
- If the download fails (maybe you were on a spotty connection), tap "Retry Check" to try again.
- The app supports 50+ languages, including languages with non-Latin scripts.
The Drawing Canvas
Once the model is downloaded, you will see the handwriting canvas. This is where you write your answer with your finger or a stylus.

The canvas has several features to help you write clearly:
Guide Lines: The canvas displays horizontal guide lines, just like lined notebook paper. These help you write in a straight line and keep your letter sizes consistent. You can toggle the guide lines on or off by tapping the lines icon (it looks like a small hamburger menu icon) near the top of the canvas. Some people prefer a clean canvas without lines -- it is entirely up to you.
Pencil Tool: This is the default drawing tool. Use your finger or a stylus to write directly on the canvas. The ink rendering is smooth and responsive, so writing feels natural.
Eraser Tool: Made a mistake on one letter? You do not need to clear the whole canvas. Tap the eraser icon to switch to eraser mode, then swipe over the strokes you want to remove. Only the strokes you touch will be erased. If you are using a pencil with an eraser button, it should work too -- press it and swipe to erase, just like using the back of a real pencil.
Clear Button: Want to start completely over? The clear button wipes the entire canvas so you can try again from scratch.
Keyboard Switch: Changed your mind about handwriting? Tap the keyboard icon to switch back to typing mode. Your progress on the current word is preserved -- you are just changing the input method.
Writing and Real-Time Recognition
As you write on the canvas, the app converts your handwriting to text in real time using Google ML Kit Digital Ink Recognition. Here is the flow:
- Start writing your answer on the canvas.
- As you write, the recognized text appears above the canvas, updating live.
- Keep writing until your full answer is on the canvas.
- Check that the recognized text matches what you intended.
- Tap "Check Answer" to submit.


Tips for Better Handwriting Recognition
The recognition engine is quite good -- it handles both cursive and print handwriting -- but a few habits will give you the best results:
- Write naturally but clearly. You do not need to write in perfect block letters. The AI is trained on real handwriting, including cursive. Just make sure your letters are reasonably distinct.
- Leave small spaces between words. When writing multi-word answers, a small gap between words helps the recognizer separate them correctly.
- Write accented characters as you normally would. For languages like French, German, or Spanish, write the accents directly on the letters. The model understands accented characters natively -- you do not need to add them separately.
- If recognition seems off, try writing slightly larger. Small, cramped handwriting can sometimes trip up the recognizer. Clearing the canvas and rewriting with a bit more space usually fixes it.
- Use a stylus for precision. Finger writing works great, but if you have a stylus (especially on a tablet), it gives you finer control and a more natural writing experience.
Getting Hints
Stuck on a word? No problem. Tap the dashed line underneath the word prompt, and a hint panel slides up from the bottom of the screen.

The hint gives you three pieces of information:
- Translation -- The answer you are trying to recall, along with a speaker icon to hear the pronunciation.
- Definition -- A brief explanation of what the word means, which can jog your memory without just handing you the spelling.
- Audio pronunciation -- Tap the speaker icon to hear the word spoken aloud in the target language.
Tap "Got it!" to close the hint and continue practicing. Hints are there to help you learn -- there is no penalty for using them. If you are genuinely stuck, it is much better to see the answer, hear it, understand it, and then try writing it from memory than to just sit there frustrated.
Correct and Incorrect Answers
When you get it right: The entire screen flashes green, and you see a clear "Well done! Your answer is correct" message. If you were using handwriting, your written answer stays visible on the canvas so you can see what you wrote. After a brief moment, the app auto-advances to the next word.

When you get it wrong: The app shows you the correct answer so you can see exactly where you went wrong. Was it a missing accent? A swapped letter? Seeing the right answer immediately after your attempt is one of the most effective ways to correct mistakes. The word stays in rotation so you will get another chance to practice it.
Mastering Words
The goal of every practice session is to master your words. Here is how mastery works:
The 7-correct-answers rule: Each word needs 7 correct spellings to be marked as mastered. As you accumulate correct answers across your practice sessions, the word's progress builds up. You do not need to get all 7 in a single session -- your progress is saved.
Manual mastery: Already know a word? You can manually mark it as mastered by tapping the checkmark icon on the word in your deck view. This skips the 7-attempt requirement entirely. This is handy when you import a deck and already know some of the words.
The Mastered tab: Once a word is mastered, it moves from the "Practicing" tab to the "Mastered" tab in your deck view. Mastered words display a green checkmark badge and the label "Mastered" so you can see your progress at a glance.
The celebration screen: When every single word in a deck is mastered, you get a celebration screen showing "All words mastered!" along with your deck's 100% completion status. You also get the option to share your deck with others -- because if you found it useful, someone else might too.
Text-to-Speech
Throughout the app, you will notice speaker icons next to words. Tap any of them to hear the word pronounced aloud.
- In the word list -- Hear the pronunciation while browsing your deck.
- During practice -- Hear the word you are trying to translate before you answer.
- In hints -- Hear the correct pronunciation alongside the translation.
The app uses language-specific voice models, so the pronunciation matches the language you are learning. This is especially helpful for languages where spelling and pronunciation do not always line up (looking at you, French).
Your first 20 text-to-speech plays are free. After that, you'll need a subscription to keep using pronunciation audio. See Settings and Account for pricing details.
A Typical Practice Session
To put it all together, here is what a full practice session looks like:
- Open your deck and tap "Practice."
- The first batch of 5 words loads. You see the first word to translate and the progress bar at 0.
- Choose your input method -- keyboard or handwriting.
- Translate the word. Use a hint if you need one.
- Tap "Check Answer." If correct, the screen flashes green and auto-advances. If incorrect, study the correct answer and try again next round.
- Work through all 5 words in the batch across multiple rounds. Words you master (7 correct) drop out of rotation.
- When the batch is complete, the next batch loads.
- Keep going until every word is mastered and you see the celebration screen.
The combination of batched learning, spaced repetition through the round system, and handwriting practice makes this one of the most effective ways to build vocabulary. Whether you are a student preparing for a language exam or a parent helping your child learn, consistent practice sessions -- even just 10 minutes a day -- lead to real, lasting results.